Engine control cables

April 6th, 2008

I've been struggling for more than a week to figure out exactly how to correctly hook up the engine control cables. Rather than fill up the whole internet with a play-by-play of the various things I tried, I'll just show you the end results.

Here are the cables mounted to the cable bracket, with clevises installed. You can sort of see that I had to drill new holes in the throttle and mixture levers in order to get sufficient travel at the other end. To do this I had to take apart the throttle quadrant, which was straightforward but annoying.

The cables fan out from the bracket in various directions. I may use adel clamps to tie the throttle and prop cables together (approximately where the piece of masking tape is) just to keep them from chafing.

The prop and mixture cable arc rather gracefully (if you ask me) over the top of the rudder pedal brace, and go through the firewall on either side of the parking brake plumbing. The previous careful measuring and use of custom-length cables paid off here, as these two cables manage to go where they need to go without getting hung up on anything. I will eventually replace the experimental duct tape with a pair of adel clamps, mostly to keep the prop cable well clear of the brake hoses.

The throttle cable is basically a straight shot from the quadrant down to the lower center of the firewall. I ended up using my 48" cable here after all, as the 49.5" one I'd ordered from Van's was a bit too long. I may end up returning that one, or I may just keep it around for whatever.

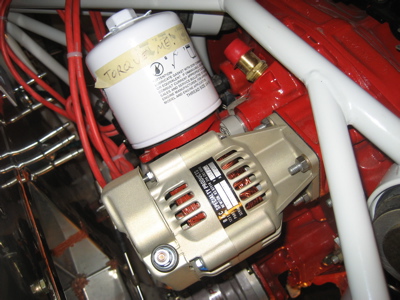
The prop cable makes a hard right turn after passing through the firewall eyeball, and crosses over the mixture cable to reach the prop governor cable bracket. Meanwhile, the mixture cable continues forward to its own cable bracket on the top of the oil sump. The throttle cable is visible down below.

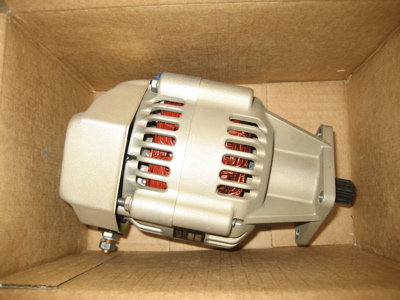
I had to use a joggled mixture control arm in order to get it to clear my Skytec NL inline starter. I think you could use a straight arm if you had a Skytec LS or PM model, but the NL is quite a bit longer than either of those two.

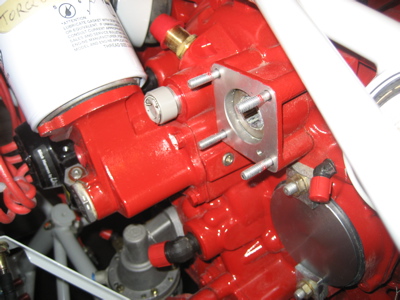
Here's how the mixture bellcrank works. The mixture cable connects to the arm on the right side of the photo, and the bellcrank provides the necessary offset to reach the mixture arm and also reverses the direction of movement. You'll note that I had to drill a second hole much closer to the mixture control arm's pivot point… this is necessary because the limited amount of travel available at the quadrant end requires a shorter mixture control arm in order to get full travel at the servo.

Here's photographic proof that the mixture can reach the full rich stop:

…as well as the idle cutoff stop:

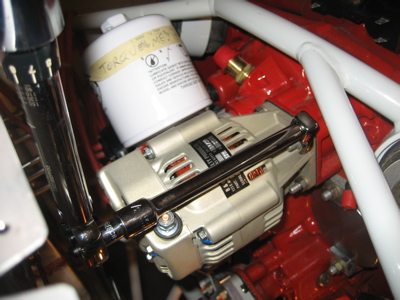
Despite the apparent complexity of the mixture bellcrank, I didn't really have much difficulty getting the mixture control working properly. The throttle was actually the hardest one, because of the very limited clearances that exist with the forward-facing fuel injection servo (if you have one, you'll see what I mean). I ended up having Mattituck send me another joggled control arm that I could use for the throttle, and shortened it as I did with the mixture arm. Here it's shown at the idle stop. Not visible is how close the rod end bearing comes to the bottom of the oil sump when the throttle is all the way back like this… it's close, but there is still just barely enough room.

With the throttle all the way to the wide open stop, the cable shaft almost touches the bottom of the oil sump as well. Moving the attachment point of the rod end bearing farther away from the pivot point is the obvious remedy, of course, but then the throttle quadrant wouldn't give me enough travel to go all the way from idle to full throttle. This would not be a problem if I was using standard plunger-style engine controls, but with the throttle quadrant it's an additional huge headache that I wasn't really expecting. I spent a week wrestling with this before arriving at this solution, and it just barely works (but it does work!). From what I've seen, I think that this wouldn't be so much of an issue with a vertical induction setup, but the combination of a throttle quadrant and forward induction is extremely tricky to get right.

Here's the prop governor cable at the fine pitch (full RPM) stop. It's actually spring-loaded to return to this position – I guess so that a broken cable will tend to return to the full RPM setting, which would be preferable to the opposite behavior in an emergency.

Once again, the throttle quadrant limits the amount of travel I can get out of the prop cable – I can only get the lever to move about halfway from the fine pitch stop to the coarse pitch stop. The plans actually mention that this might happen, but they don't provide a recommended minimum amount of travel. Just to be safe, I fired off an email to the manufacturer of my prop governor, to determine a) if this is an acceptable amount of travel, and if not; b) if a shorter control arm is available.

I set things up so that at the most forward position (full throttle, high RPM, rich mixture), all three of the engine control levers are almost, but not quite, at the end of their travel. There is a gap of about 1/16" at the top of each lever's travel, which provides a certain amount of "springback" to let you know that you've hit the actual stop on the engine instead of just hitting the limit of the lever's travel within the throttle quadrant. This is a good practice that I picked up from one or more RV elders. Obviously, in a situation like mine where the throttle quadrant is the thing that gives you the most problems in getting full travel out of your controls, you have to be very careful about balancing the goal of getting the correct amount of positive springback against the desire to get as much travel out of your quadrant as you can. Tricky.

At the full-aft position, the throttle and mixture levers are not quite at their limit of travel, so I know from the springback effect that the throttle and mixture are hitting the correct stops on the engine. The prop lever does hit the quadrant housing and limits the amount of prop control movement, as discussed above.

Here's a shot from the floor of the airplane, looking up into the bottom of the throttle quadrant. It's not quite as bad as the perspective in this photo makes it look, but there is still not a lot of clearance between adjacent clevises within the quadrant. I'm going to have to get creative to keep the engine control levers from jamming against one another.

Note: All the preceding photos were taken during development, before any hardware was installed for good – hence the absence of cotter pins. When I decide that the engine controls are really, really done, only then will I go to the trouble of installing all the correct fasteners.

Update: For those who've emailed asking about cable lengths, the final sizes I picked were 48", 51", and 52.5". Obviously these lengths are only applicable to my particular airplane, but if you are using a DJM quadrant with an IO-360-M1B and Bendix/Silverhawk injection these will be a good place to start.

Aux alternator and tach drive cap

April 1st, 2008

I've been playing with engine control cables but they're giving me fits, so no photos until I figure out what I'm going to do. In the meantime, I decided to take a break from control cable hell and install the B&C SD-20 standby alternator.

The SD-20 is gear-driven, and installs on the vacuum pump drive pad on the engine accessory case. I removed the drive pad cover plate and cleaned off the old gasket sealant in preparation for mounting the alternator.

I used a crow's foot adapter on my torque wrench to tighten three of the nuts – the last one was impossible to reach with the torque wrench, so I used a plain wrench and tightened it by feel.

The alternator, installed:

In the photos above, you can see the cap that I put on the tachometer drive gear. I actually installed it a week ago, but since Mary was out of town with the camera I'm only just now getting around to taking pictures of it. Here's a closer view:

Between the oil filter adapter and the standby alternator, there's just about zero room to install a traditional mechanical RPM sender on this engine – I'll probably use a Hall effect sensor on the mag instead. Here's another view from a different angle, showing how I safetied the cap:

I read somewhere that it's actually optional to cap off the tach drive if you're not going to use it, but I'm just not cool with leaving a hole into the engine's whirling guts uncovered.

Throttle quadrant cable bracket

March 16th, 2008

To attach the engine control cables underneath the panel, I made this little bracket out of 2"x2"x1/8" aluminum angle. The three small holes are for the cables, and the other holes are just to lighten it a bit.

Because the bracket will be somewhat visible hanging down under the panel (at least when you're standing on the ground behind the wing looking in) I decided to paint it black. The paint was taking forever to dry in the cold garage, so I laid the bracket on top of my little electric radiator, using a piece of scrap alclad as a tray. It cured fully after just a couple hours in the sauna.

Here is the cable bracket clecoed to the throttle quadrant supports. The green cable is from Van's and the clevis ends are from Aircraft Spruce (the clevises that Van's sells won't work).

Another view. I had to have at least one cable on hand so I could know where to mount the bracket, but without mounting the bracket I wouldn't know what length of cables to get. I chose to solve this dilemma by buying one cable in a standard 48" length, and using it both to locate the bracket and to determine how long the real cables actually need to be. Since it's a standard length, I can return it for 90% credit later, and I don't have to waste money trial-fitting with expensive custom cables that can't be returned if I guess the wrong length.

I hooked my test cable up to each of the three engine controls in turn. Here's a view of how the prop cable is routed from the eyeball in the upper-left corner of the firewall, down to the prop governor bracket. With this part adjusted correctly, the portion of the cable inside the fuselage needs to be a few inches longer.

The throttle cable comes through the firewall low and in the middle, and runs up to the bracket I previously bolted to the sump.

Inside the fuselage, the throttle cable is about an inch too short:

I forgot to take a picture of the mixture cable, but you get the idea of how this process went. In the end, I decided I needed cables that were 49", 51", and 52" long. I called Van's to order these and found that they also have standard-length cables in 49.5" and 52.5" lengths… the cable lengths can be varied somewhat, so I decided to order those two standard lengths and one custom 51" cable.

By the way, these cables come with a most interesting label on them:

Not for use on aircraft indeed.

Family visit

March 8th, 2008

My brother and me working on some little detail:

Showing off the panel to my dad:

Mary, me, and my brother:

Throttle quadrant

March 2nd, 2008

I've been agonizing for quite a while about how to mount the throttle quadrant that Mary gave me for our anniversary last year. Specifically, I was concerned about the degree to which the throttle quadrant was going to impact the amount of available legroom – I'm somewhat tall and I want to be comfortable sitting in this airplane on long trips. Another perplexing issue was the inconvenient lack of substantial structure behind the panel to which a throttle quadrant could be mounted.

Well, recently I started playing with the standard Cessna-style, plunger-type control cables, and was surprised to find that the bracket required to mount them was going to come uncomfortably close to my right knee. You see, my panel is an inch or so taller than stock, and the bracket that the plunger controls attach to has to be pretty wide because the knobs are arranged side-by-side, with a couple inches of spacing in between adjacent knobs… the combination of those two factors made the bracket intrude on my personal space. So, I started taking a hard look at just how the quadrant might be mounted. I started by mocking up the mounting location using spring clamps and scrap aluminum, then installing the pilot's seat and climbing into the fuselage for an ergonomics check. You can see in this photo that there's at least a couple of inches between the throttle quadrant and my right knee under normal circumstances:

On long solo trips in calm air in my RV-9A, I always used to like slouching sort of sideways across the cabin, stretching my right leg over to the passenger side. That airplane had the short, stock panel, so it was easy to do. With the throttle quadrant here, I can't get my leg all the way across without my knee hitting it, but a decent amount of slouching-ability is still retained. I can deal.

I put the transponder into its rack, just to make sure that my hand won't bump it when the throttle is fully open. With the way I have the quadrant suspended below and aft of the bottom of the panel, there's plenty of clearance. And yes, I did make airplane noises.

This is how the quadrant mounting setup looked about halfway through the process. I sort of made up the design as I went along, using various bits of scrap angle. With the airplane up on the gear, access to the under-panel area is somewhat inconvenient, involving a lot of crawling in and out of the fuselage with the help of a stepladder, so it was tricky to get all these pieces measured and aligned.

To close out the top of the throttle quadrant and make it look nicer, I freehanded this little cosmetic trim piece out of some scrap aluminum. I don't fancy myself much of a metalworking artist, but I'm pleased with how it turned out.

I painted the trim piece flat black to match the quadrant and panel. I also painted the exterior faces of the side mounting rails, since they'll be visible after they're mounted.

Here's the finished product, bolted in place. It's very strong – if I had any strength or agility whatsoever I could probably do handstands on it. The prop lever (i.e. the middle one) is centered laterally on the panel, so the pilot and passenger have an equal amount of legroom. Since the travel-sized Mary will be my main passenger, I thought about biasing the quadrant to the right a bit to give myself more room, but in the end I decided to take a more egalitarian approach so giants like John can ride in comfort.

The fasteners at the aft (panel) end of the mounting structure are primarily loaded in tension, so I used #8 structural screws (AN525's) instead of rivets there.

At the forward end, I drilled out one of the subpanel reinforcement brackets and replaced it with a longer one that ties into the port-side quadrant mounting rail. A couple more little pieces of angle tie into the other mounting rail and give it some additional torsional stiffness. All this aluminum angle is starting to make the under-panel area look like a jungle gym, but it's strong and light and nobody will see it.

The painted trim piece looks pretty sharp:

When the throttle lever is in the idle position, the sticks can get tangled up with it if you use full forward-stick and full aileron deflection. I'll be trimming the sticks to eliminate this potential safety issue – they're overly long as received, so I'd planned to shorten them anyway – but I'll wait until I have the elevators and ailerons hooked up before I do it. I have a feeling that the stick has a wider range of motion when it's not hooked to the rest of the control system, compared to how it will actually move in the finished airplane.

Now that I have the throttle quadrant installed – and I must say, it turned out great – I'm left with the problem of determining what length of cables I'll need to connect it to the engine. Dave Parsons was kind enough to share the cable lengths he used for his quadrant setup, so I'll use those as one data point. To avoid wasting money having custom-length cables made only to find I picked the wrong size, I decided to order from Van's a single 48" cable, which is one of their standard sizes. If that works for one of the three controls then great, I will keep it. If not, I can send it back unused for a credit, and having it on hand should get me close enough to be able to measure how long I need my custom cables to be.