12V socket

May 18th, 2009

I installed a simple 12-volt socket on the passenger side of the panel, for powering miscellaneous devices:

I used 14-gauge wire and a 10A fuse for this socket. A rubber boot over the positive terminal protects against shorts.

What do you think, should I use this as my backup GPS?

Mary graduates

May 17th, 2009

Congratulations to Mary on earning her doctorate!

She's been working a whole heck of a lot harder on her education than I have been on my airplane. That may have something to do with the reason why she got done first, and she definitely earned it.

And yes, the girl in the background does have a giant pill on her head.

Headset jacks

May 10th, 2009

This weekend's main task was to connect and install the pilot and passenger headset jacks in the brackets I'd previously made. Each occupant has separate jacks for headphone audio and microphone, plus a separate Bose jack that combines phone and mic audio plus power for my nice ANR headsets. Add in the wiring for the push to talk button, and you end up with a lot of wires that all have to be carefully soldered to the jacks. Of course all the wiring is shielded too, and you have to join multiple shields together in a couple spots. The wires that come attached to the Bose jacks are 26 gauge, which is just incredibly small and difficult to work with. I think I'm still slightly cross-eyed from sorting out all those tiny wires.

Here's the same thing tied into a nice bundle and installed in the bracket. Note that I used heavy heatshrink to support the connections.

I left generous service loops for future maintenance:

The audio connector on the GMA 347 is by far the busiest connector in the whole panel. The bundle of shielded wires going to this connector keeps getting bigger and bigger. Luckily there's just a handful of connections yet to be made on this particular connector. Man, I really overused the word "connector" in this paragraph.

I made Mary come downstairs and help me test my handiwork by talking back and forth using a pair of headsets. It all worked! Not quite Alexander Graham Bell, but satisfying anyway.

I thought I would knock out the headset jacks in an hour or two and then move on to other things… instead it took me two afternoons to finish it all. Just a lot of fiddly little things to get hooked up and working right.

Desiccant plugs

May 9th, 2009

I put in a new set of desiccant plugs in the engine this weekend… after two years of service, the old ones were starting to lose their magic ability to dry out when I put them in the oven every few months.

Parking brake cable

May 3rd, 2009

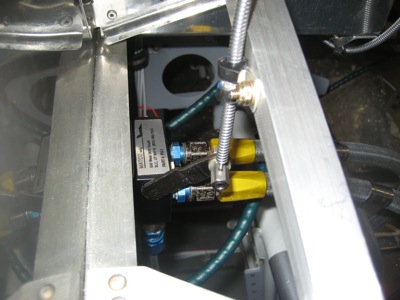
Time to install the parking brake cable… I actually had to remove the parking brake valve from the airplane, since I quickly discovered that the lever will hit the hose fitting once the control cable nut is installed. Good thing I used nutplates on the valve bracket – at least it was easy to remove.

The lever is joggled a bit, but I had to bend it further to keep it from hanging up. Seems like kind of a silly design to me.

I bought a locking cable and drilled a hole for it underneath the transponder. I briefly toyed with the idea of somehow hanging it off the side of the throttle quadrant, but this way is much easier.

The brake cable is secured with about a million adel clamps. The first one is screwed to a little flange and nutplate that I riveted to the bottom of the radio stack reinforcement angle that goes along the bottom of the subpanel.

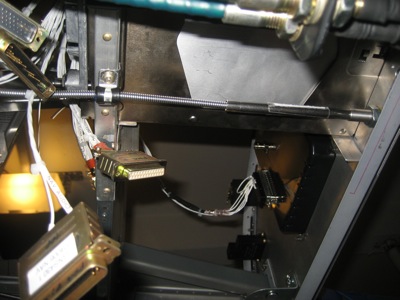
From there, it goes forward to the bottom of the avionics shelf and turns left…

Another clamp helps it turn the corner and head upwards. It's actually not this wavy-looking in real life, it's just how it looks in a macro photo.

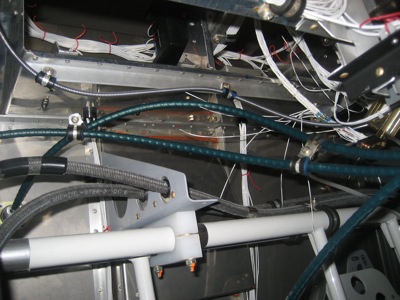
One more clamp sends the cable straight up, where it does a 180 and points downward to the brake valve. A final adel clamp holds the cable end, and is attached to a sloping piece of angle I ran between the F-695 fuselage gusset to the left subpanel rib.

All this elaborate routing is required because of the way the valve lever operates. When the parking brake knob is pushed all the way in, the lever is down and the brake valve is open – in other words, the brakes will work normally.

When the knob is pulled out a couple inches, like this…

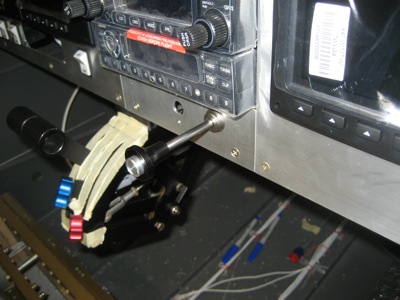
…the lever is up and the brake valve is closed, trapping pressure in the brake lines and keeping the brakes applied even after you let up on the pedals. Note that the end of the cable sheath provides a positive stop to keep the lever from going over center… I'll probably replace this cushioned adel clamp with one of these later on, just so the cable can't slip.

This is all pretty simple, but like many things it's not in the plans and you're left to your own devices. The whole panel area is full of situations like this – in fact, I've been so busy doing my own thing with wiring and whatnot that I don't think I've looked at the plans for many months.