Got the VS ready to rivet

June 23rd, 2005

I didn't get to fly as much tonight after work as I'd planned, so I got to work on the RV just a little bit. I swapped air connectors so I could run the rivet gun – as an aside, boy do I not like using the air tools without my handy swivel connector and my lightweight couplers – and smashed in the rivets that attach the ribs to the lower part of the forward vertical stab spar. Then, everything gets clecoed together:

I'll have to make sure to be extra nice to Mary so she'll be willing to come out to the sweltering garage to pound in these rivets this weekend…

VS spar riveting

June 22nd, 2005

I managed to find enough normal-sized air couplers laying around the garage to get the squeezer hooked up, so I was able to get the rear vertical stabilizer spar riveted together:

(Note that I keep an ample supply of lubricant available to make the work process go smoother)

The next step has you rivet the VS ribs to the front spar. I managed to get the upper and center ribs attached, but the geometry of the lower rib/spar interface has me stumped. I guess I'll either figure out a way to get the squeezer on those rivets, or I'll just smash them with the rivet gun. In that case, I have to wait for the new air fittings to arrive on Friday so I can get my regular air lines hooked up again and run the rivet gun.

Primed VS parts (again!)

June 21st, 2005

Tonight I primed the replacement vertical stabilizer spar parts…

…and I also decided to lightly scuff and prime along the rivet lines inside the skin:

So I was all set to start riveting this baby together, when my Avery lightweight air coupler somehow came apart.

Of course one of the five little steel balls rolled off into a dark corner somewhere, so even if I could get the stupid thing back together, it probably wouldn't work right. Oh well, a new one is only six bucks, and I was going to pick up a few other things anyway, so back to the Avery website we go.

Back to the VS again

June 20th, 2005

Another week has gone by without much of a chance to work on the plane, but the house painting is now finished. Mary is happy, and thus I continue to have a riveting partner. Tonight I dimpled and countersunk the lower parts of the VS spar and spar reinforcement, and deburred all the remaining edges. Ran out of time to clean and spray primer… but I've done quite enough painting lately, so it's somewhat okay.

Back to the VS

June 15th, 2005

Now that the HS is finished, it's back to the VS for yours truly. I match-drilled the new spar reinforcement bar to the new VS spar, and then set about cutting out a new set of lightening holes. I discovered that the non-removable pilot drill in my fly cutter had gotten bent somehow, so this time around I decided to try a set of hole cutters from Hougen by way of Cleaveland Tool:

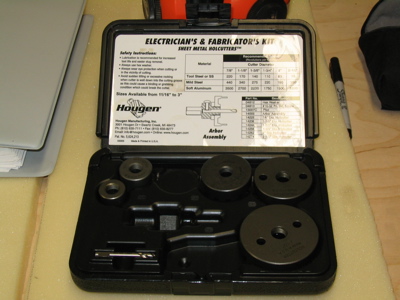
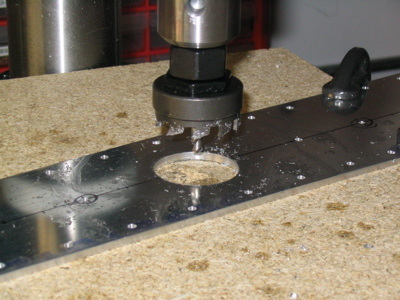
They were outrageously expensive but they do a good job of cutting nice round holes, and give me the willies somewhat less than the fly cutter. The other aspect I failed to realize until after I'd bought them is that the set doesn't include a 1 1/2" cutter, only 1 3/8" and 1 3/4" ones. Rather than spend yet more money special-ordering the correct cutter size, I decided to just cut the specified 1 1/2" holes 1/8" undersize using the next smallest cutter I had. Since the lightening holes are optional anyway, it just means that I have a spar reinforcement bar that's slightly heavier than it needs to be.

Let's see… five 1 1/2" holes that are each undersized by an eighth of an inch, in 1/8" thick aluminum… 0.224 in3 of extra material, at 2.643 g/cc… the tail of my airplane will be a third of an ounce heavier than it might otherwise be. Yeah, I think I can live with that.

For the remaining two 2" holes I did have the right sized cutter, so I finished those too and all my lightening holes are now drilled. Deburring will have to wait till tomorrow when I can run the air tools without waking up the neighbors.