Working on tailwheel mount

February 11th, 2006

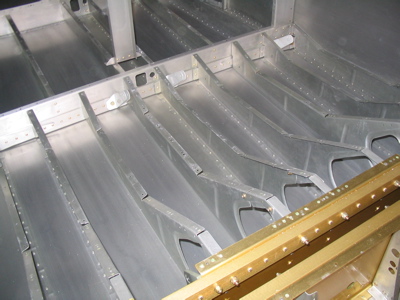
This weekend's project is the tailwheel. There's a steel mount that bolts between the two aftmost bulkheads, and you have to cut an odd-shaped slot in the aft bottom skin to let it poke through. First I removed the aft bulkhead, which in the quickbuild kits is only held in with a few temporary pop rivets – it was still a pain to remove it, though, because of the way the aft fuselage tapers. I xeroxed the full-scale template from the plans, then aligned it on the inside of the skin by shining a light through the bulkhead rivet holes and lining the marks up. It worked out pretty well.

I marked the cutout and started the front end with a unibit:

Like with the landing lights, I rough cut with snips and then used drum sanders and files to enlarge the hole. I probably filed away at it for an hour before the mount fit through. I'll clean up the edges and make it look pretty tomorrow. The hole just aft of the bulkhead there is for a socket to go through later on when I'm installing or servicing the tail spring. It gets pretty close to the center rivet, but it's per plans.

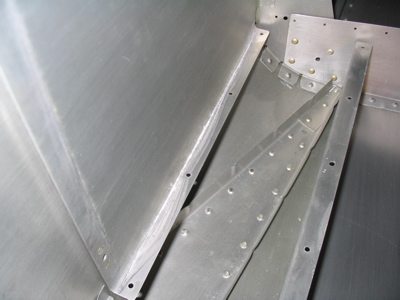
Here's how the mount fits in:

Two 1/4" bolts secure it to the forward bulkhead. These were tricky holes to drill because the tailwheel mount is made of some kind of extra hard steel, and the shape of the mount makes it tough to get a drill in there – not to mention the fact that you have to locate the pilot holes by back drilling from the other side. You have to hold it square with one hand, hold the angle drill with your second and third hands, and hold the shop light with your fourth hand. These bolt holes came out fine though, and the tailwheel mount is straight.

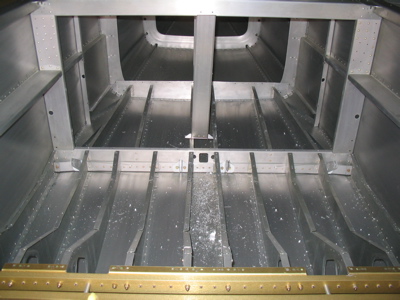
The "mouse hole" at the bottom of the aft bulkhead is enlarged to fit the mount:

Reinstalling the aft bulkhead tomorrow is going to be a pain – it was hard enough to remove. Stay tuned.

More fuselage inventory

February 9th, 2006

More surveying of the work done on the quickbuild fuselage tonight. I also removed some more parts that were temporarily installed with blind rivets. First up were these stubby angle pieces (F-705G I think) that are only used with the tip-up canopy; I'm building a slider:

Small collection of parts removed from the fuselage. The angle pieces on the left go in the scrap bin, and the things on the right will get trimmed and reinstalled later on.

I also had to remove the aftmost bulkhead so I can install the tailwheel spring. Here's the bulkhead along with the weldment to which the tail spring will attach. I have to trim the lower skin before I can install this, though.

Pop rivet shish kebab:

Not very interesting to look at, but I spent quite a bit of time going carefully over the plans, checking off what's been done and marking the steps still left to do.

Fuselage housecleaning

February 8th, 2006

Bah! I've been too tired and/or busy to work on the plane for a week. The cold weather hasn't helped my motivation much either. I haven't been totally slacking, though – last week I completed my instrument cross-country flight, which puts me that much closer to finishing the instrument ticket.

Anyway, tonight I started working on the fuselage a bit. I still have to finish the wing bottom skins and the fuel tank covers, but that's work than can be done whenever I feel like it. Meanwhile, the wings are parked in the corner of the garage while I mess with the fuselage.

I started by removing all the interior panels that can be unscrewed, and drilling out the temporary pop rivets that were holding the baggage floors in place. I also decided to remove the seat pans, which involved drilling out a few solid rivets as well. This is mostly for peace of mind after reading this forum thread from a guy who discovered rusty tools left inside his quickbuild fuselage! I didn't find anything in there, though, other than a bunch of packing foam detritus and some drill shavings, mostly of my own making:

I'll re-attach the seat pans once I've inspected the seat belt anchors and run electrical conduit for later use. I think I'll also go the route that some folks have taken and install the baggage floors with screws and nutplates instead of blind rivets – that way I can put stuff like the strobe power supplies under there and still have access later.

Here's a big pile of the stuff I removed:

After attacking the mess with the shop vac, it's a lot cleaner in there:

I found a couple spots in the bottom of the fuselage that were encrusted with some salty-looking gunk, probably from condensation during the overseas shipment:

This one was kind of funny, just a single little spot where a drop of salt water must have fallen:

I cleaned them off with a scotchbrite pad and verified that it was just gunk sitting on top of the primer, not corrosion on the metal.

Tomorrow's task will be to continue going through the plans, checking off the steps that've already been done during the quickbuild assembly. Should be a lot easier now that I can get to the stuff that was underneath all those panels.

AOA Drain

February 1st, 2006

Tonight I fabricated a simple drain tube for the upper AOA port. It's intended to channel the drained water down and out of the wing, as well as helping to guide the pin to the drain plunger. I started with a VA-112 fuel tank drain flange, which is normally mounted on the exterior of the fuel tank skin. I drilled another set of mounting holes and countersunk them so I could mount it the other way around:

Here's the drain hole and the rivet pattern. These rivets will be flush, fulfilling my goal of having none of this stuff poking out in the breeze.

And here's a shot of the finished product. A piece of clear vinyl tubing from the aviation aisle at Lowe's is slipped over the drain, and feeds down to an AN816-6-2D pipe nipple that I had lying around. That's kind of an odd size for normal use, but it worked great for this application. The tubing is a tight enough fit on both ends that I didn't bother with hose clamps.

The angle between the two ends is a little funny because I didn't plan to do this whole thing originally – I just located the hole where it was a straight shot up to the drain plunger, which makes sense if you're just going to use the drain pin without a guide tube. The bend in the tubing is due to the fact that the upper and lower skins aren't parallel here, which I'll allow for next time. I'm pretty happy with how this first attempt turned out, though.

This was probably overkill from the point of view of draining out water – I'm given to understand that hardly any water ever enters the AOA port in the first place – but it does a dynamite job of guiding the pin to the plunger when you're poking it up into the wing without being able to see what you're doing.

Roll servo wiring

January 29th, 2006

I was travelling or doing errands for most of the weekend, so I didn't get anything done on the plane besides running the wires for the autopilot roll servo. Two adel clamps and some tie wraps keep the wire bundle safely away from the moving parts. The only snafu is that there's no way to tighten the screws that hold the d-sub connectors together unless you take the servo completely out. I think I'll try to find some thumbscrews to use there instead.

I bought this cool label maker that can print directly onto shrink tubing. Now I won't forget that this connector at the wing root is for the "roll servo". Okay, maybe this didn't need to be labelled, but I had to test out my new toy.