Archive for the ‘Fuselage’ Category

Playing with fuel vent line

Sunday, July 9th, 2006

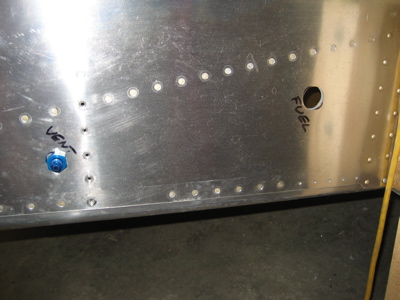
I drilled the holes in the fuselage side skins for the fuel vent and feed lines. The vent line gets a 90-degree bulkhead fitting, and the feed line gets a big 1" hole and a rubber grommet. I hope the prepunched guide holes were in the right place, 'cuz I just put some big honking holes in the side of my airplane.
I used some scrap pieces of 1/4" tubing I had laying around to experiment with the bends needed to form the fuel line. This is the lower forward part, down under the rudder pedals. Not too difficult:

This is the lower rear part, where the tube has to come off the elbow fitting and then zigzag around the rudder cable. Tricky.

Here's the upper forward part, where it makes an odd bend underneath the weldment in order to clear the engine mounting bolt:

None of this is too hard, although doing all of the above with one continuous piece of tubing will be interesting.

While I was messing around, I finally got around to filling in the prepunched pilot holes for the steps with some AN426AD3 "rivets to nowhere", as the plans call them. We don't need no stinking steps on this tail-dragging airplane!

My parents were in town, so my dad came down to the garage to check out the RV. He seemed pleased, as you can tell:

(Really)

Random stuff / Control sticks

Sunday, June 11th, 2006

I did a bunch of random junk this weekend, but apparently didn't take too many photos. I bought a handful of plumb bobs and some fishing line, which will be useful for hanging the wings (planned for next weekend). I cleaned up the shop a bit, and leak-tested the second fuel tank – as of tonight, two days later, the balloons I put on it are still inflated. Hooray for proseal.

I also messed around a bit with the control sticks. I had to file a bit off of the stick weldments in order to get them to fit where they're supposed to go. After I took this photo I sealed over the exposed steel with the powdercoat touch-up paint so there won't be any rusting.

I primed and assembled the pushrod that ties the two control sticks together. The wing looks terribly dirty in this photo, but it's just the flash.

After what seemed like an eternity of fiddling with washers in tight spaces, I got the control column installed in the fuselage.

Installed seat belt anchors

Tuesday, May 16th, 2006

Here are the seat belt anchor brackets, with nutplates installed, attached to the underfloor ribs with the prescribed blind rivets:

I made a pair of little covers out of 0.016" alclad, to cover some of the big hole in the seat pan. One end has a little slot so they can be removed easily along with the floors. I think they will look classy when they're painted.

Sometime next year, when I can't find where I put these little covers, somebody please remind me that they're in the box with the harnesses.

Seatbelt anchors

Sunday, May 14th, 2006

Here's me fitting the center seat harness (aka crotch strap) anchors to the under-floor ribs. I used a 5/16" spacing between the brackets instead of the 1/8" that the plans call for, due to the greater bulk of the Hooker harnesses. This took a lot of tweaking before everything was in its proper place. I used the angle drill to drill the brackets to the ribs.

I feel like a genius for deciding not to rivet in the seat pans yet. I don't have a 1/4" threaded bit for the angle drill, but I was able to just yank the floors out and use the regular drill to put the bolt hole through both brackets. Brilliant!

The rotary buckle requires a much larger hole in the forward seat floors than the precut ones:

This hole is a little ugly. I could have done a better job rounding the corners; I accidentally filed away a lot of the nice radius I had on them. Oh well. Since the hole is so big, I may fabricate a little cover to put over it when it's installed for real, to keep pens and pencils and so forth from falling down in there and causing unpleasantness with the control system.

After all this I did the same set of operations on the passenger side. As usual, the second time I did the job it went much faster since I didn't have to spend so much time scratching my head and reading the plans.

I shot some primer on the brackets and then followed up on the areas that will be visible from inside the cabin with my official interior paint of choice: Rustoleum Textured in "Dark Pewter". This stuff is nice looking, easy to use, and bulletproof.

You can also see in the above photo that I moved the bolt hole 1/2" below the standard location, as required by the Hooker harnesses.

Tomorrow when these are fully dry I'll pop rivet them in place. I'm glad I went ahead and did these seatbelt anchors now – if I'd waited until after the control system and pushrods were installed, it would have been a real pain.

Belt puzzle answers

Thursday, May 11th, 2006

A kind reader saw my seatbelt predicament and sent me a very helpful note and some photos, which he agreed to let me reproduce here for anyone else who's facing this issue. Thanks, Jim!

Hi Matt

I have recently installed the Hooker 5-point harness. Three comments with pictures may be helpful.

1. The attachment hole in the plates in Van's crotch strap kit needs to be placed lower to allow the steel shackle to sit correctly in the opening in the plates.

2. The attachment plates in Van's crotch strap kit are 1/8" apart. Although this is the correct spacing for the shackle, the Hooker strap is thicker than this and consists of three layers of webbing sewn together.

This pushes the front attachment plate further forward.

I had to make the two front screw holes in the seat pan oval to allow the screws to line up with the front attachment plate.

3. The length adjustment buckle is too wide to fit through the hole in the seat pan.

I had to widen this slightly.

Jim Talbot
Tauranga
New Zealand

This is pretty much exactly what I had resigned myself to doing, after I called Hooker and they had no help to offer me, so it's great to have photos to examine while I lay things out – this weekend when I have some time to work on it, that is.